Bird Curatorial Manual | Installing Birds

Specimens may be installed once cataloging has been completed and all skeletal material has been cleaned, numbered, and labeled. Skins, skeletons, and alcohol specimens are installed in three different areas, and differ in their arrangement. 

Proper installation is critical for ensuring that specimens are not “lost” (imagine trying to find a mis-placed specimen in a collection of over 190,000 birds!). When installing accessions with more than just a few specimens, it is helpful to download a spreadsheet of the data from Arctos and add a column for tracking the installation progress. This spreadsheet should be labeled “Accn#####_installation,” and should be put in the same folder on the local server as the rest of the data for that accession.

Erika Brock working in the bird collection.

Skins

This section contains details on how MVZ bird skins are organized in the collection, and their specific arrangement in specimen trays. Scroll down for examples of how to search Arctos when installing bird skins to determine where to place them in the collection.

Skins are organized in the following hierarchy:

    1. Taxonomic down to species or subspecies (if polytypic)
    2. Geographic within the lowest taxonomic unit to the level of states/counties
    3. Geographic within a state/county from north to south and west to east
    4. Elevationally from low to high within an identical specific locality
    5. Chronologically within the same locality (including elevation) by day and month regardless of year
    6. Numerically by collector or MVZ catalog number if the locality and date are identical for a given taxon

Taxonomic Arrangement: Refer to Arrangement of Bird Families and MVZ Bird Taxonomic Checklist for taxonomic organization. Place any specimen not identified to species at the end of the last species in the genus.

Geographic Arrangement: The geographic arrangement is intended to allow curators and researchers to see how phenotypes (e.g., size, color, pattern) change in different geographic areas and associated environments. The chronological arrangement within a locality provides organization of skins by annual cycle (e.g., breeding, molting, wintering).

Within the smallest taxonomic unit designated, skins are arranged geographically from north to south and from west to east. There may also be a specific order of states or provinces within a country, as well as a specific order of counties within some western states within the United States. See Geographic Order for Bird Skins for lists of geographic arrangement. Place specimens taken from the ocean adjacent to the closest landmass. Place any skins without a specific locality at the end of the closest matching geopolitical unit (e.g., the county if known, otherwise the state).

Within each smallest geographic unit, skins are arranged from north to south with respect to a given locality.to

Examples:

5 mi NW Nowhere
5 mi NE Nowhere
3 mi NE Nowhere
1 mi NW Nowhere
5 mi W Nowhere
Nowhere
5 mi E Nowhere
3 mi S Nowhere

Skins arranged by geography.

Consider the grid map above (it can represent a country or an area). The arrangement of localities goes from the most northwestern point to the most southeaster point. Northern points always take precedence over southern points. The locality sites would be listed in the collection in the order of A, B, C, D, E, F, G, H. Note that if two localities are at the same latitude, like E and F, the more western one comes first (site E). However, in the case of sites F and G, F comes first because it is more north.

This north-south arrangement is varied if linear features limit the bird’s distribution (e.g., a string of coastal salt marshes). In that case, the linear features path is followed in arranging localities.

Elevational Arrangement: Within a given locality, elevations are arranged from lowest to highest.

Chronological Arrangement: If birds of a given taxon were collected from the same locality and elevation, then they are next organized by month and day, regardless of year.

Numerical Arrangement: If all of the above data are identical, the birds are ordered by catalog number, from lowest to highest.

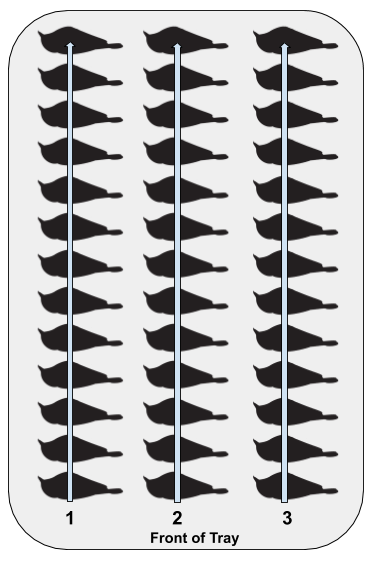
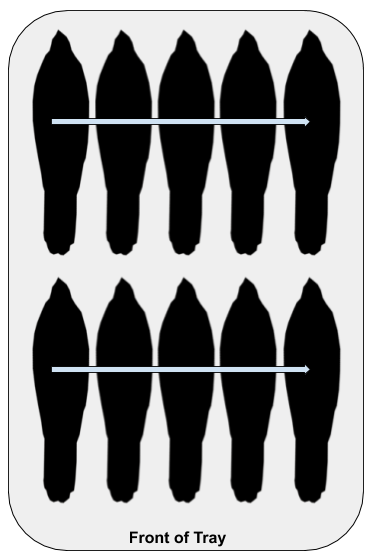
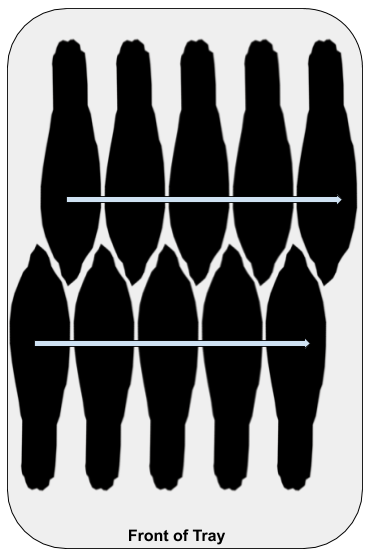
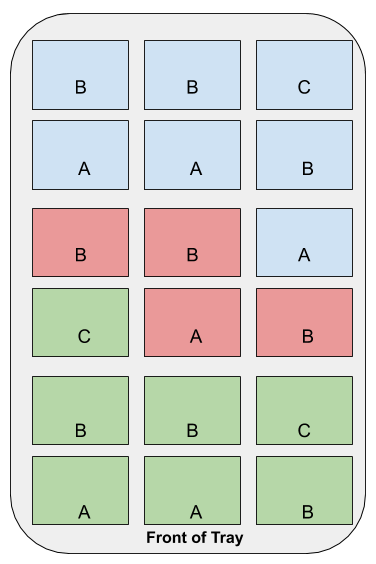
Arrangement of Skins in Drawers: Skins are arranged in the tray from the front to the back within each row of birds, starting with the left front. See diagram below for an example of how to arrange birds if there are two rows in the tray. Place the name side of the skin label face up on the first and last specimen within each row of a tray, and on the first and last specimen of each species or subspecies. For all other specimens, place the data side of the label face up and place the label over the tail or to the right of it.

Skins arranged front to back, starting from the left.
There may be multiple families, genera or species/subspecies sharing one tray.
Medium-sized skins (e.g., shorebirds, some woodpeckers) may be staggered in two rows to fit best in the tray.
Larger skins (e.g., Common Raven) may be staggered to fit best in the tray.
Larger skins (e.g., hawks) may best fit with heads pointing back in two rows.
Larger skins also may best fit with heads pointing in opposite directions in two rows.

Example 1: Filter Arctos Search by a Specific County

You need to install some study skins of Cyanocitta stelleri frontalis from Calaveras County, California, and there are already dozens of specimens installed for this county. How do you know which skins are more north or more west than any other skin? Arctos has a mapping function that makes this process relatively easy.

From the main Search page in Arctos:

  1. Within Identifiers, select a Collection to search. Click the small arrows to expand the menu, then click the check box next to Bird specimens (MVZ:Bird).
  2. Within Identification and Taxonomy, type the scientific name (“Cyanocitta stelleri frontalis)” into the Any taxon, ID, common name field. If this search takes too long and times out (e.g., lots of records to return), you can also search by Genus, Species, and Subspecies in separate fields at the bottom of this section. You may need to expand the block of fields in this section by clicking on “Show More Options” in the upper right of the section.
  3. Within Locality, type the county you are searching for into the County field. If the county has a common name found in multiple states (e.g., Orange County) you may also wish to enter the state to the State/Province field. Type in “Calaveras” and “Calaveras County” will pop up. Select that.
  4. Within Catalog Record, type “skin” into the Part Name field. This will ensure that non-skin specimens (e.g., skeletons, fluids) will not appear in the search results. Arctos will search for all “skin” parts and display them in a menu. Don’t select a specific type of skin (e.g. skin, study) as there may be other types of skins (e.g., skin, flat) in the collection that you need to consider.
  5. Click Search.
  6. On the next page there will be a drop-down menu that says Tools: Map, Customize, or Download. Use the drop-down menu to select Mapping Tools –> Map results in BerkeleyMapper.
  7. Use the generated map to visualize the geographic arrangement of all skins within your searched county. This map will help you determine where the skin(s) you want to install should go relative to other skins from that county in the collection. Click on the markers to view the MVZ catalog number(s) at specific points. If there are multiple specimens from an area, you may need to zoom in closer to get a more refined view of the spatial distribution of points.

Example 2: Filter Arctos Search by aLL COUNTIES

Using the same example as above, you may have skins of Cyanocitta stelleri frontalis from multiple counties in the same accession. In this case, it is more efficient to filter records by county, and then select the specific county to view the distribution of localities and also to confirm or assist with subspecies identifications. In determining subspecies, it is helpful to see what identifications have been used in different counties.

To return a filtered scientific name search displaying all possible counties:

  1. To the right of the Search button (near the top of the page) is the option to See results as followed by a drop-down menu. From the menu, select Specimen Summary.
  2. A new drop-down menu will appear called Group by. Scroll down the menu and click the box next to County.
  3. Within Identifiers, select a Collection to search. Click the small arrows to expand the menu, then click the box next to Bird specimens (MVZ:Bird).
  4. Within Identification and Taxonomy, type the scientific name into the Any taxon, ID, common name field. You can also search by Genus, Species, and Subspecies separately (i.e., if the more general search times out).
  5. Within Catalog Record, type “skin” into the Part Name field. This will ensure that non-skin parts (e.g., skeletons, fluid specimens) will not be displayed on the generated map.
  6. Click Search.
  7. The next page will display a list of all counties with skins for that taxon. Click on a blue link next to a county name to generate that county’s list of specimen records.

Note that this will return records for all counties regardless of state. If you want to filter more specifically for counties within a state, you can either add that to your “group by” option or you an enter the state name (“California”) in the State/Province field.

Skeletons, Eggs and Nests

Boxed skeletal material, egg sets, and nests are housed separately from bird skins. Boxes are arranged by family and subfamily according to the MVZ Bird Taxonomic Checklist. Within a family or subfamily, the genera, species, and subspecies are arranged alphabetically (first alphabetically by genus, then by species within a genus, then by subspecies within a species).

Within a species or subspecies, the specimens are arranged alphabetically by higher geography (not specific locality), i.e., Country, then State/Province within a country, then County within a state (USA only). Examples: Mexico goes before United States; Arizona goes before California which goes before Oregon; within California, Alameda County goes before Contra Costa County which goes before San Francisco County. 

 Within a given geographic area, specimens are installed by catalog number from lowest to highest. Specimens with questionable identification (e.g. unknown genus, species, subspecies, or ?) at any level are placed after the last known level (e.g. if subspecies is known, specimen is placed after other known subspecies).

Lack of box uniformity makes maintenance of rows difficult at times. Install boxes in order as best as possible, given those constraints. Keep boxes as close together as possible to minimize shifting when trays are opened and closed.

Instructions for installing skeletons and nests.
Arrangement of skeletons in tray.
Arrangement of nests in tray.
Arrangement of eggs in tray.

Fluids

All work with bird fluid specimens or parts should be done in the Herp Lab, with proper safety training and authorization (contact Staff Curator of Herpetology).

Fluid-preserved (anatomical) bird specimens are stored in Room 3191. Families and subfamilies are arranged according to the MVZ Bird Taxonomic Checklist. Within a family, genera and species are arranged alphabetically. Each new genus gets its own row on the shelf. 

Within the lowest taxonomic unit, specimens are arranged alphabetically by higher geography, i.e., Country, State/Province, and County (USA only).

Interior of Room 3191.

We do not separate bird fluid specimens by specific locality. If there is more than one jar of a species from the same county, then the specimens should be installed so that the jars are ordered with consecutive MVZ catalog numbers. 

The specimens are stored in 70% ethanol in one of three jar sizes: gallon, half gallon, and pint. Specimens should be installed in the smallest jar that fits the bird. If there is already a jar of the same species from the same geographic area (e.g., county), install the specimen in the same jar if it fits. If it doesn’t fit, add a new jar for that species and location. Fluid specimens should be installed head first. Do not handle the specimens by the tail!

In addition to whole fluid-preserved specimens and carcasses, the MVZ also houses a collection of fluid-preserved anatomical parts (e.g., syrinx, stomach contents) and parasites. The syringes and parasites are typically stored in 20 mL glass scintillation vials, while stomach contents may be stored in jars of various sizes depending on the material. Cataloged parts are kept in plastic boxes with drawers on the right-hand bank of shelves as you enter the bird alcohol collection room. Vials and jars are arranged strictly numerically based on the MVZ catalog number, without regard to taxon or geography. Uncataloged parts are kept in metal boxes on the same shelves until they are cataloged; these are arranged by preparator/preparator number or by the MVZ Prep Lab Catalog number.