Bird Curatorial Manual | Curating Media

Jump to Section:
About MVZ Media
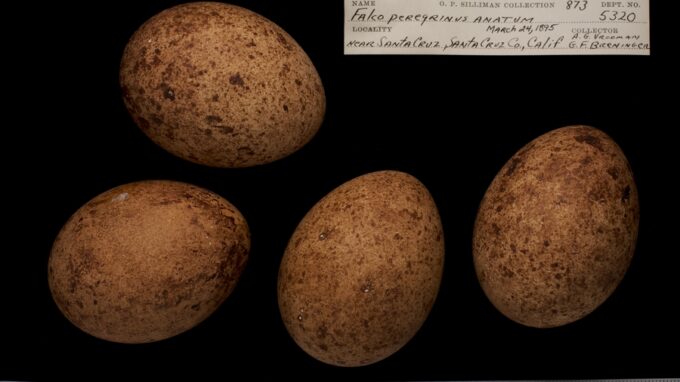
This section deals with curating media associated with bird specimens, egg/nest specimens, or bird observational records in Arctos. Media may include audio recordings or images, and images may show the specimen, bird observation, or habitat as well as related expedition photos (e.g., people, camp). The MVZ egg and nest collection was photographed as part of a National Science Foundation grant-funded project to increase access to that collection, along with digitization of audio recordings archived in the museum.
- New egg and nest specimens are routinely photographed and linked to the records in Arctos as part of the curatorial workflow. Likewise, any original data slips received with egg and nest specimens are scanned and linked.
- Egg Photography Protocol
- Egg Data Scanning Protocol
Submission of audio recordings should follow MVZ protocols.

Storing Media at MVZ
Media should be stored on the MVZ local intranet server, with the location dependent on the media type. The Staff Curator will provide access to the correct directory on the server, or will copy them to the directory as needed if media are shared electronically (e.g., flash drive, Box, Google Drive).
- Audio recordings – New audio recordings to catalog should be stored on the server’s OCIP drive in the directory Data —> New_Recordings_to_Catalog. Create a folder for each accession with recordings.
- Bird specimen or field images (including observations) – Bird specimen or field images should be stored on the server’s CuratorialMedia drive in the directory Media —> MVZBird. Create a folder for each accession with images. If images are of specimens that have been cataloged into the collection (e.g., images taken by visitors or curatorial assistants), create a folder for each set of specimens that describes the content of the folder.
- Egg or nest specimens – Images of egg or nest specimens should be stored on the server’s Curatorial drive in the directory Bird Curatorial —> Bird Eggs —> Egg Photos or Nest Photos, respectively. Place new photos in a “to upload” folder labeled with a description of the contents (e.g., “miscellaneous to upload” or “Accn14615_to_upload”).
- Egg or nest data slips – Scanned images of data slips associated with egg/nest specimens should be stored on the server’s Curatorial drive in the directory Bird Curatorial —> Bird Eggs —> Egg Data Scans —> slip scans. A different directory labeled “card scans” was used for scans of MVZ egg catalog cards, but should not be used for new data scans. Place new scans in a “to upload” folder labeled with a description of the contents (e.g., “miscellaneous to upload” or “Accn14615_to_upload”).
Curating Media
There are three main steps involved in curating media and making them accessible for research, education, and public use:
- Cataloging media – Assigning a unique number to each media object.
- Uploading media to TACC – Making media accessible through a unique URL.
- Linking media in Arctos – Creating relationships between media and data in Arctos.
Detailed procedures for each of these steps are described below.
Audio Recordings
Audio recordings in WAV format should be converted to MP3 for web viewing prior to uploading the media to TACC. Both file formats will be uploaded to TACC. The easiest way to convert WAV to MP3 files is through Audacity (available for free):
- Open Audacity and drag your file(s) to the window. You can drag multiple files at once.
- If you are converting a single file, go to File —> Export —> Export as MP3. Keep the default settings, select your folder, and hit Export.
- If you are converting multiple files, go to Select —> All, and then File —> Export —> Export Multiple. Keep the default settings, select your folder, and hit Export.
- If you have files in multiple folders, convert one folder at a time. Close the Audacity project but do not save it. Move to the next folder and repeat the conversion process.
Audio recordings are assigned a cut number that specifies a unique recording for a cataloged record (specimen or observation). If a specimen or observation has more than one recording, assign a separate cut number to each one. Each cut will have its own metadata (see tab for Linking Media in Arctos). The spreadsheet below shows the next available cut number (the original document is located in the MVZ shared Google Drive folder). The Staff Curator will assign all audio cut numbers for bird recordings.
Eggs and Nest Images
Egg and nest photos should be taken after the specimens have been cataloged and labeled, but prior to installing them into the collection. Photographs of eggs and nests are assigned the same catalog number as the specimen, with file names following this convention: 14908_egg.tiff and 14908_nest.tiff (Note: images may have the extension *.tif from the camera, but should be renamed with a *.tiff extension prior or during the ingest to TACC).
Scans of egg/nest data slips are also assigned the same catalog number as the specimen, but without “egg” or “nest” in the filename, e.g., 14908.tif (Note: extension *.tif is used for these scans).
Bird Specimen, Observation, or Field Images
Photographs other than those for eggs and nests are cataloged in the MVZ image collection. These may include images of bird specimens, observations, or fieldwork (e.g., people, camp, habitat, etc.).
The next available image number is taken from the log file labeled “MVZ_Media_Accession_Catalog” (accessed through the MVZ shared Google Drive folder. The Staff Curator will assign all catalog numbers for bird-related images. Information requested includes: collection (e.g., MVZ:Bird or MVZObs:Bird), accession number, begin and end catalog number, date assigned, name of person entering the information, and a brief description of the material. This document should be updated as the files are uploaded and ingested to TACC, and subsequently linked in Arctos.
All media are uploaded to the Texas Advanced Computing Center (TACC) for web access. Media should be uploaded at their original resolution. After they are ingested onto the web server, they will be processed into lower resolution versions for web viewing or listening.
In general, the Staff Curator will be responsible for bird-related media uploads to TACC. The basic steps are as follows:
- Become a TACC user. All MVZ media are uploaded to a project titled “MVZ-Media-Archives” through the TACC User Portal. In order to access the project, you need to be added as a user.
- Secure FTP to Corral. Use a secure FTP site to transfer files to the Corral system at TACC. You will need a TACC token for authentication. See the Arctos Handbook for instructions on how to do that. Be sure to place files in the appropriate directory. Bird media files typically go into one of three folders:
- audio
- eggs —> subfolder photos (egg or nest specimens) or slips (for egg data slips/cards)
- images —> subfolder MVZ_Img —> subfolder images (e.g., tif files) or born_jpeg (if jpeg is the original file format)
- Contact TACC. Email Chris Jordan at TACC to notify him that there are media ready to ingest.
- Remove files. One media are ingested, remove them from the Corral directory so that you don’t mix old files with new ones that are added later.
Links to TACC directories with MVZ media:
Audio:
High resolution WAV recordings: https://web.corral.tacc.utexas.edu/MVZ/audio/wav/
Web version MP3 recordings: https://web.corral.tacc.utexas.edu/MVZ/audio/mp3/
Eggs and Nests:
High resolution photos: https://web.corral.tacc.utexas.edu/MVZ/eggs/photos/
Web version photos: https://web.corral.tacc.utexas.edu/MVZ/eggs/photos/jpg/
Thumbnail version photos: https://web.corral.tacc.utexas.edu/MVZ/eggs/photos/tb/
High resolution data slip scans: https://web.corral.tacc.utexas.edu/MVZ/eggs/slips/
Web version data slip scans: https://web.corral.tacc.utexas.edu/MVZ/eggs/slips/jpg/
Thumbnail version data slip scans: https://web.corral.tacc.utexas.edu/MVZ/eggs/slips/tb/
High resolution catalog card scans: https://web.corral.tacc.utexas.edu/MVZ/eggs/cards/
Web version data slip scans: https://web.corral.tacc.utexas.edu/MVZ/eggs/cards/jpg/
Thumbnail version data slip scans: https://web.corral.tacc.utexas.edu/MVZ/eggs/cards/tb/
Images (other than eggs and nests):
High resolution photos (not born jpeg): https://web.corral.tacc.utexas.edu/MVZ/images/MVZ_img/images/
Web version photos (not born jpeg): https://web.corral.tacc.utexas.edu/MVZ/images/MVZ_img/images/jpg/
Thumbnail version photos (not born jpeg): https://web.corral.tacc.utexas.edu/MVZ/images/MVZ_img/images/tb/
High resolution photos (born jpeg): https://web.corral.tacc.utexas.edu/MVZ/images/MVZ_img/born_jpeg/
Web version photos (born jpeg): https://web.corral.tacc.utexas.edu/MVZ/images/MVZ_img/born_jpeg/jpg/
Thumbnail version photos (born jpeg): https://web.corral.tacc.utexas.edu/MVZ/images/MVZ_img/born_jpeg/tb/
Once the media have been uploaded and ingested at TACC, they will be processed into different file formats for web viewing:
- Audio – WAV files will be processed to MP3
- Images – TIFF files will be processed to JPG and TB (thumbnails); born digital jpeg files will be processed to a lower resolution JPG version as well as a TB.
After the media files have been processed, they are ready for linking to cataloged records that have been entered into Arctos. If there are just a few media, this step can be done by creating media directly in Arctos (also see “How to Create Media” in the Arctos Handbook). Alternatively (e.g., for larger data sets), you can bulkload a media metadata file with basic information about the media and its relationship to the cataloged record. Audio recordings uploaded as WAV files require two sets of metadata: one for the original WAV file, and one for the processed MP3 file. Because the MP3 files are derived from the WAV files, the WAV metadata must be uploaded first in order to create the relationship between the two datasets.
Creating media directly in Arctos
- Login to Arctos. You will need “Manage Media” permissions in order to create, upload, or edit media.
- Search for the cataloged record that you want to link to a media object (e.g., image or recording).
- In the Media block on the specimen detail page, click on “Attach/Upload Media” (link in upper right corner).
- For most MVZ media, we will use Option 2 (Create Media from URL). This assumes that the media (web version and thumbnail) are at TACC. There may be times when you want to upload media directly (e.g., a text file with data, a scan of related correspondence, etc.), in which case you can use Option 1 (Upload Media). This will upload media directly, but will not put the files into one of our existing directories. You can also link to existing Arctos media (e.g., if a media object has been created and you want to link it to another cataloged record).
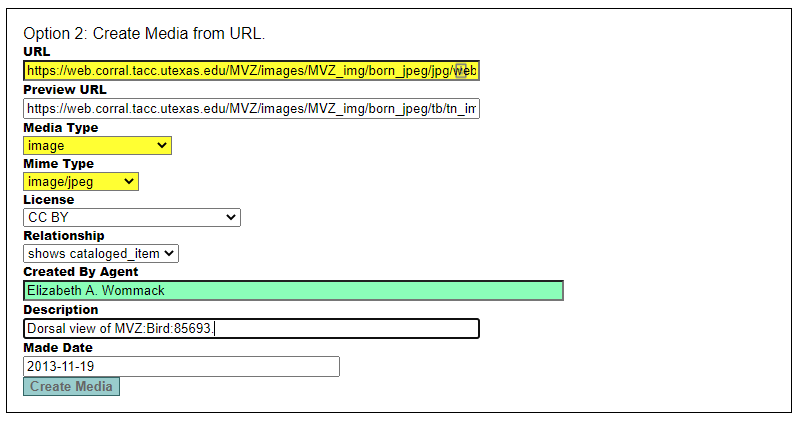
- Complete all fields (see screenshot below):
- URL: This should be the web version (jpeg or mp3 file). For born digital files that are already in jpeg format, use the file in the jpg subdirectory that has the “web” prefix.
- Preview URL: This is the thumbnail version in the “tb” subdirectory. This applies only to image files (there is no Preview URL for audio files).
- Media Type: image or audio.
- Mime Type: image/jpeg, audio/mpeg3, audio/x-wav, etc.
- License: Select “CC BY” (Creative Commons with Attribution).
- Relationship: Shows cataloged_item (this is automatically selected if you’re creating media from the cataloged record).
- Created by Agent: Person who took the photograph or made the recording. Enter the last name and hit the tab key to select the person from the Agents table.
- Description: A description of the media, e.g., “Dorsal view of MVZ:Bird:85693.”
- Made Date: The date that the media was created (e.g., the date of the photo or recording).
- Click on Create Media.

Bulkloading media metadata to Arctos
- Login to Arctos. You will need “Manage Media” permissions in order to create, upload, or edit media.
- Go to Batch Tools —> Bulkload Media Metadata
- Download a CSV template, or use one of the sample spreadsheets provided below. Fill out the metadata and save the file in CSV format. (Tip: Use a Text Editor such as Textpad to check the file and remove any extra rows at the bottom. Excel typically adds one extra row, but sometimes there are more.)
- Choose a file to upload, and click on “Upload this file.”
- Be patient! It takes a while to process, so refresh your screen periodically. The Status column in the Media Bulkloader (in “My Stuff“) will show “pass” if the data look good.
- The Status column also will show any errors with the data (e.g., if the media URI provided in the data is invalid). You will need to fix and reload any data with errors.
- Once the data pass their check, they will be in the queue to load. Again, be patient! The time to load depends on what else is in the queue.
- Once they have loaded, values in the Status column will change from “pass” to “loaded.” You will receive an email indicating the number of loaded records in the Media Bulkloader. Delete the records by going to “My Stuff” (accessible only if you’re logged in) in the Media Bulkloader: DELETE from temp media where status = anythingloaded
Sample bukloader metadata files:
