
Once the media have been uploaded and ingested at TACC, they will be processed into jpeg and thumbnail versions for web viewing. Born digital jpeg files will be processed to a lower resolution jpeg version as well as a thumbnail.
After the media files have been processed, they are ready for linking to data in Arctos. If there are just a few media, this step can be done by creating media directly in Arctos (also see “How to Create Media” in the Arctos Handbook). Alternatively (e.g., for larger data sets), you can bulkload a media metadata file with basic information about the media and its relationship(s) to other data.
Creating media directly in Arctos
Login to Arctos. You will need “Manage Media” permissions in order to create, upload, or edit media.
If the media is of a cataloged record (specimen or observation):
- Search for the cataloged record.
- In the Media block on the specimen detail page, click on “Attach/Upload Media” (link in upper right corner).
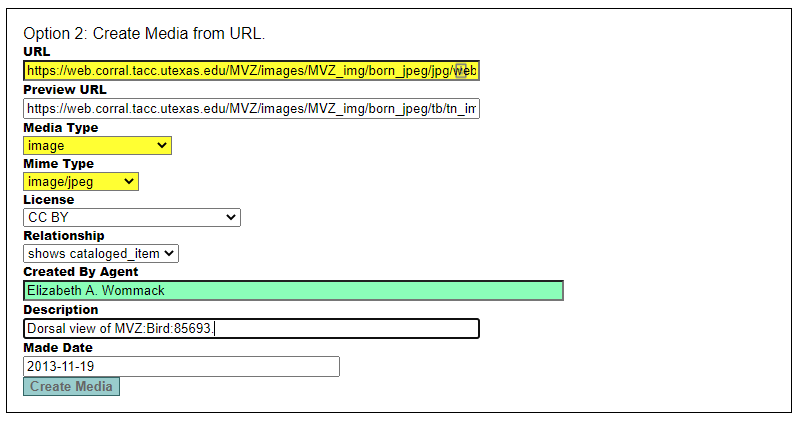
- For most media, we will use Option 2 (Create Media from URL). This assumes that the media (web version and thumbnail) are at TACC. There may be times when you want to upload media directly (e.g., a text file with data, a scan of related correspondence, etc.), in which case you can use Option 1 (Upload Media). This will upload media directly, but will not put the files into one of our existing directories.
- Complete all fields (see screenshot below):
- URL: This should be the web version (jpeg file). For born digital files that are already in jpeg format, use the file in the jpg subdirectory that has the “web” prefix.
- Preview URL: This is the thumbnail version in the “tb” subdirectory..
- Media Type: image.
- Mime Type: image/jpeg.
- License: Select “CC BY” (Creative Commons with Attribution).
- Relationship: Shows cataloged_item (this is automatically selected if you’re creating media from the cataloged record).
- Created by Agent: Person who took the photograph. Enter the last name and hit the tab key to select the person from the Agents table.
- Description: A description of the media, e.g., “Dorsal view of MVZ:Bird:85693.”
- Made Date: The date that the image was created.
- Click on Create Media.
Bulkloading media metadata to Arctos
- Login to Arctos. You will need “Manage Media” permissions in order to create, upload, or edit media.
- Go to Batch Tools —> Bulkload Media Metadata
- Download a CSV template, or use one of the sample spreadsheets provided below. Fill out the metadata and save the file in CSV format. (Tip: Use a Text Editor such as Textpad to check the file and remove any extra rows at the bottom. Excel typically adds one extra row, but sometimes there are more.)
- Choose a file to upload, and click on “Upload this file.”
- Be patient! It takes a while to process, so refresh your screen periodically. The Status column in the Media Bulkloader (in “My Stuff“) will show “pass” if the data look good.
- The Status column also will show any errors with the data (e.g., if the media URI provided in the data is invalid). You will need to fix and reload any data with errors.
- Once the data pass their check, they will be in the queue to load. Again, be patient! The time to load depends on what else is in the queue.
- Once they have loaded, values in the Status column will change from “pass” to “loaded.” You will receive an email indicating the number of loaded records in the Media Bulkloader. Delete the records by going to “My Stuff” (accessible only if you’re logged in) in the Media Bulkloader: DELETE from temp media where status = anythingloadeds