Tissue Curation
Handling Tissues & Dry Ice Access
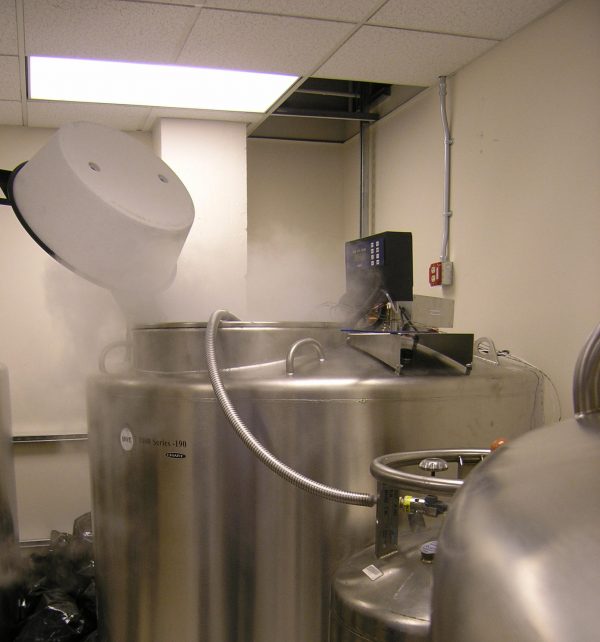
Frozen tissues should be kept on dry ice that is available on a recharge basis. The dry ice cooler is located between the VLSB and LSA doors on the first floor, behind a door that goes to the loading dock and dumpsters. When taking dry ice, record the number of scoops on the clipboard sheet with your name and “MVZ Curatorial” as the lab. Tissues should be cataloged on the first floor in the liquid nitrogen facility. There is also a gray dry ice cooler in that room for storing dry ice that is left over.
Taking & Labeling Tissues
Protocols for the collection of tissues vary depending on the situation and preservation method. Review the “Guidelines for Collection of Bird Tissues” for protocols specific to bird tissues. This document includes guidelines for preserving bird tissues in liquid nitrogen, RNALater, or buffer/ethanol, as well as preservation of blood on microscope slides.
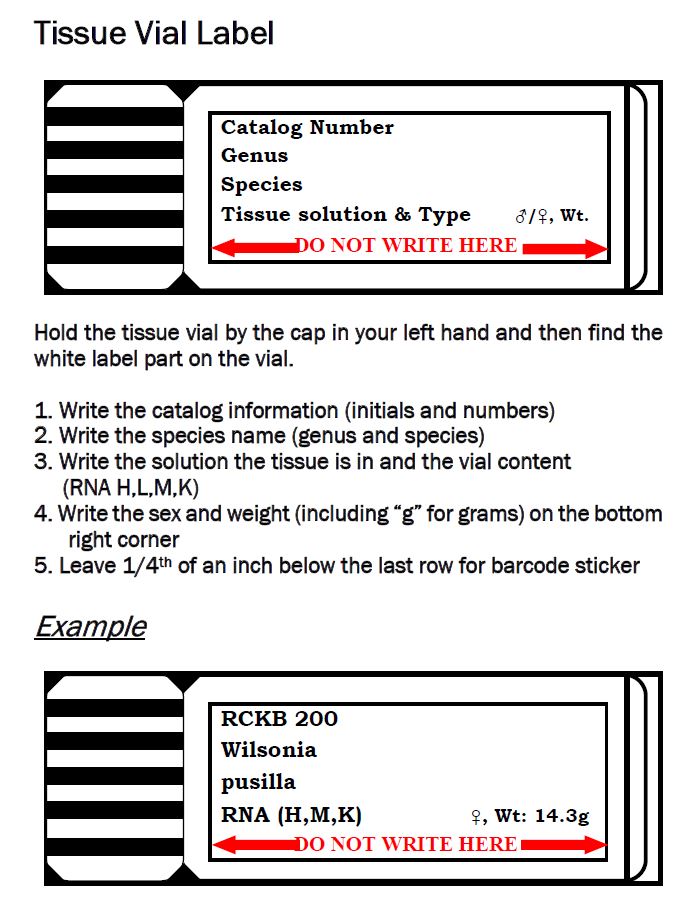
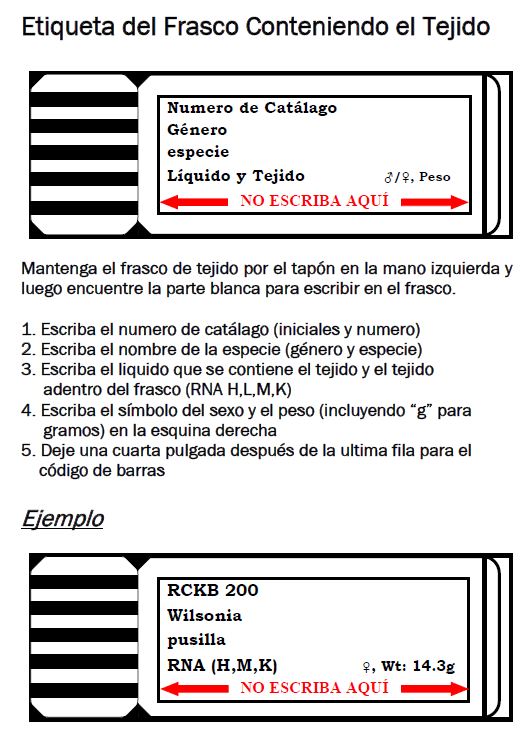
Follow the procedures below for labeling tissue vials. It is important to leave some space at the lower edge of the white label on the vial, because that will be covered up with the barcode (if there is writing, it will be hidden by the barcode).
Creating Barcoded Box Positions
Barcodes in Arctos are organized in a hierarchical system. Each tissue vial gets a barcode that goes into a position in a barcoded box. Once the tissues are ready to install into a LN2 freezer, the barcoded box gets scanned into a barcoded slot in a barcoded rack in a particular freezer. More details on installing tissues is provided below.
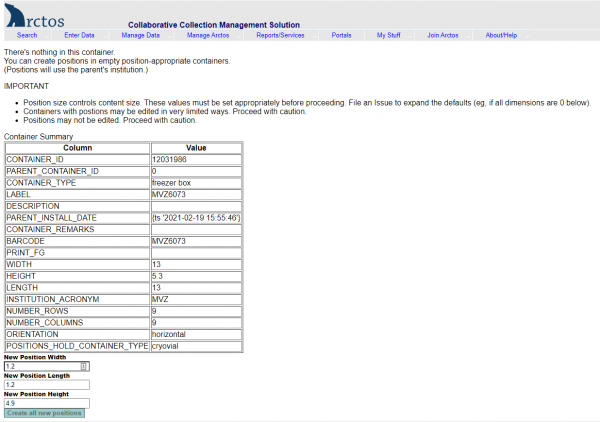
Cataloged and uncataloged MVZ tissues go into barcoded polycarbonate boxes with a 9 x 9 grid. Official box barcodes have the format “MVZ1234” where the four-digit barcode number follows the institution acronym. Box barcodes are already entered into Arctos, but positions must be created for the box before tissues can be scanned into position in the box. The same procedure for MVZ barcoded boxes applies to temporary barcodes that might be created for uncataloged tissues (see below). Follow these steps to create barcoded box positions:
- Search for the box barcode in Arctos by entering or scanning the barcode into the “Barcode” field in Find Container “(Manage Data —> Object Tracking —> Find Container ).
- Click on the little box to the left of the barcode to get details for that container.
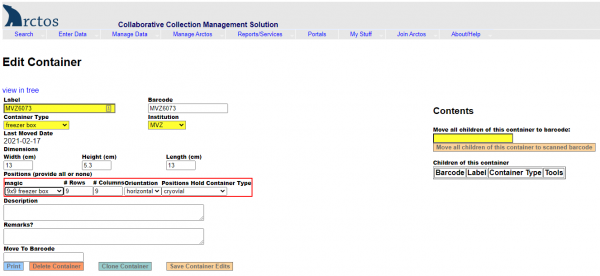
- Click on “Edit this Container” on the right side of the screen.
- Under Dimensions, enter width=13, height=5.3, length=13.
- Under Positions, select “Magic” —> 9 x 9 freezer box.
- Hit “Save Container Edits.”
- Exit out of that window, and search on the barcode again in Find Container.
- Click on “Positions” on the right side of the screen.
- Click “Create all new positions” at the bottom of the screen.
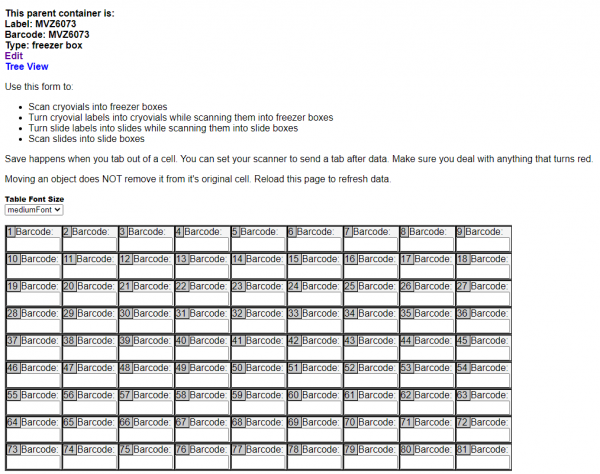
- You will now have a box with empty positions that you can use to start scanning barcoded tissue vials.
Tracking Uncataloged Tissues
Each collection tracks uncataloged tissues in different ways. Tissue vials are treated as containers in Arctos, where they are identified by both a barcode and a label. The label is intended to correspond with the original information (e.g., preparator’s number) written on the vial. When the MVZ tissue collection was barcoded in 2009-2013, the barcode was entered into both of these fields by default. Tissues may be tracked by either the barcode or the label.
The following guidelines describe the procedures for tracking uncataloged tissues.
- Get a box with a temporary BIRD barcode for uncataloged tissues from the Staff Curator. Accessions from field expeditions, curators, and specific sources (e.g., Lindsay Wildlife Hospital and other wildlife rehabilitation centers) are given their own boxes. Miscellaneous tissues received through random salvage are combined into boxes even though they consist of multiple accessions. Talk to the Staff Curator about where to put uncataloged tissues. The list of uncataloged tissue boxes is tracked in a Google Doc (log – newbirdaccns) that is also used to track the status of all bird accessions; access is granted by the Staff Curator.
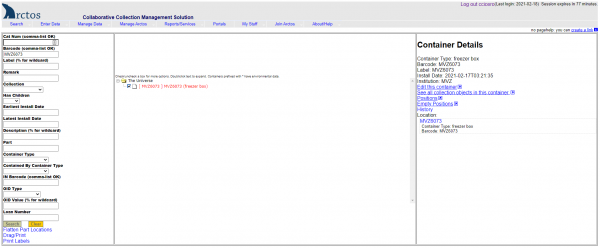
- In Arctos, go to Manage Data –> Object Tracking –> Find Container.
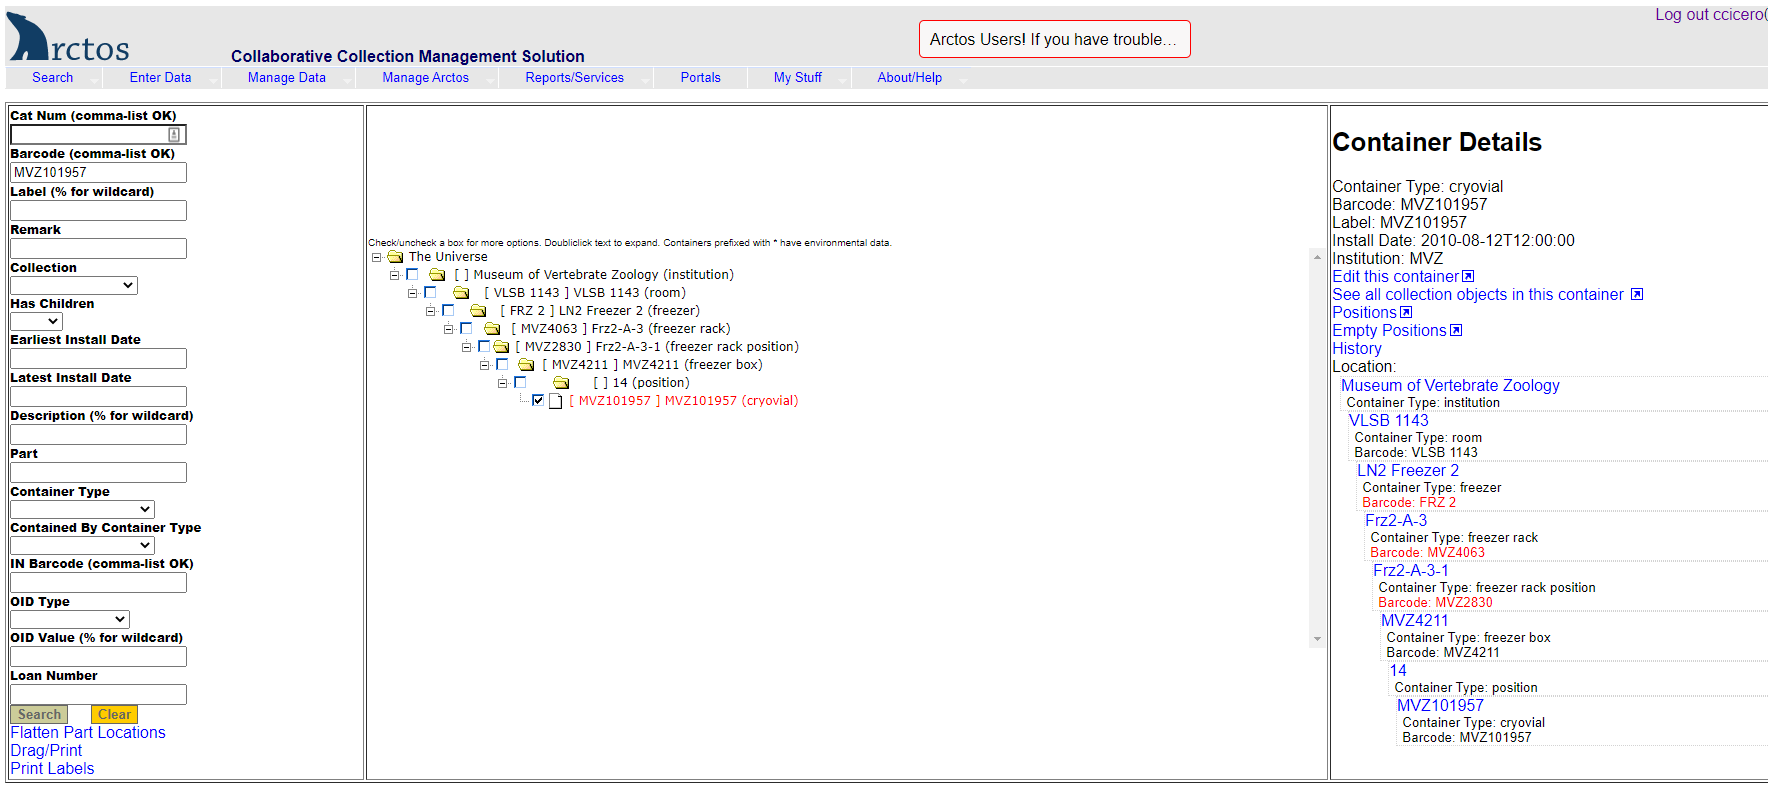
- On the left side of the screen in the Barcode field, scan the barcode of the uncataloged tissue vial (e.g., “MVZ101957”).
- On the center of the screen, click on the little square box to the left of the barcode number of the vial.
- On the right side of the screen, click on “Edit this container.”
- A new “Edit Container” screen will open. At the top in the Label field, replace the current value (which should be the vial’s barcode) with the initials and number of the collector/preparator as it’s written on the vial (e.g., “MJA 23”). Hit “Save Container Edits.”
- If there are multiple vials for a specimen, and each vial has a different tissue type that’s noted on the vial, that information should be spelled out in the Remarks field. If the tissue was preserved frozen, enter only the tissue type (e.g., “Liver.”). If the tissue was preserved another way, such as in RNAlater, enter the tissue type and preservative (e.g., “Liver RNAlater.”).
- In a different window, go to Find Container and scan (left side of screen in Barcode field) the temporary barcode (e.g., BIRD 158) of the box where the tissue will go.
- On the center of the screen, click on the little square box to the left of the barcode number of the box.
- On the right side of the screen, click on “Positions”.
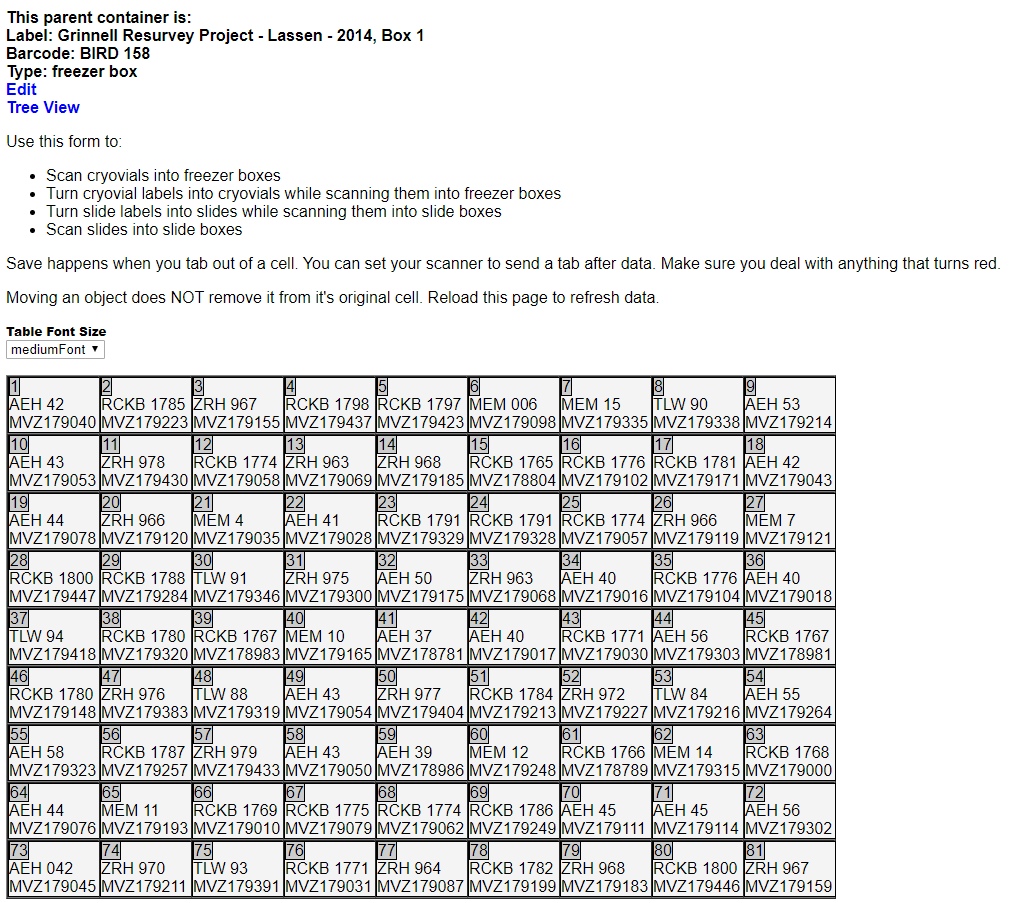
- Place your cursor in the cell for the position where you want to install the tissue, and scan the vial barcode into that position. Hit tab to move to the next cell.
- Continue doing this in subsequent cells (positions) for each tissue to be put into a temporary box. After you are finished, the Arctos screen will look like this:
- When done with the box, find the rack in the liquid nitrogen freezer where you want to put the box. The organization of uncataloged tissue boxes is tracked in the “log – newbirdaccns” Google doc mentioned above. If this is an existing box that was previously put into liquid nitrogen (and to which you’re adding more tissues), put the box back and you’re done.
- If this is a new box that has never been put into liquid nitrogen, you must scan the box into the right position in the rack in order to record its location. This is done in the following steps.
- In Arctos, go to Manage Data –> Object Tracking –> Move Container.
- At the bottom in the field for “Parent Barcode,” enter the barcode on the side of the slot or shelf where the tissue box will be installed.
- At the bottom in the field for “Child Barcode,” enter the barcode of the box with the tissues to be installed.
- Hit “Move Container” and you’re done. Put the rack back in the freezer.
Uncataloged herp tissues are housed in the liquid nitrogen room (either in liquid nitrogen Freezer 1 or the chest freezer) and in ultra-low freezers on the fourth floor of VLSB. Those housed in liquid nitrogen are from Jim McGuire accessions. Tissues are not scanned individually into box positions. Rather, boxes are created with a label that describes the contents, e.g., “McGuire Indonesia” with a range of field numbers and the trip year. If there are known missing tissues, that is entered into the description field. It’s best to talk with the Staff Curator for guidance on where to put uncataloged herp tissues.
Uncataloged mammal tissues are housed in the -80 chest freezer in the liquid nitrogen room, or in a few cases (e.g., finishing graduate students) in ultra-low freezers on the fourth floor of VLSB. Tissues are organized by accession, inventoried, and entered into a google doc called “Mammal Tissues Inventory- Working Copy.” Access to the google doc is granted by the Staff Curator. After cataloging, tissues are scanned into barcoded boxes and kept in the -80 chest freezer until they are transferred to the liquid nitrogen Freezer 3 that houses both cataloged and uncataloged mammal tissues.
Cataloging Tissues
Assume that tissues exist for an accession unless told otherwise by the collector or donor. Data on tissues should be obtained from the field/prep catalog. However, because collectors/preparators may be inconsistent in annotating tissue information, tissues should be inventoried before adding them in Arctos.
All tissues should be cataloged at the same time as voucher specimens. If the accession includes a mixture of MVZ-vouchered and non-vouchered tissues (including vouchers deposited in another institution), the non-vouchered tissues should be integrated with the vouchered material when cataloging.
Tissues are treated like any other specimen part when cataloging. Tissues may be added either in the Arctos data entry screen (before the data have been loaded), in a bulkloader spreadsheet, or after the data have been loaded.
Instructions for Arctos
The first step in cataloging tissues is to find their location. The procedure will differ by collection depending on how uncataloged tissues are tracked (see above). To search for tissue locations in Arctos, you will need manage_container permission. Once logged in, go to Manage Data —> Object Tracking —> Find Container. You can either search by the barcode or label associated with a vial or freezer box.
If the data have been loaded into Arctos and you only know the MVZ catalog number or the accession number, you will need to find the collector/preparator information first. Go to Search —> Catalog Records, select the collection from the dropdown (e.g., MVZ Bird Specimens), and enter either the MVZ # in the “Catalog Number” field, or the accession number in the “Accession” field (tip: precede the accession number by an equal sign for faster searching, e.g,. “=15466”). Use the initials for the collector/preparator in your object tracking search.
Example of searching for a tissue vial by collector/preparator initials and number.
Enter the initials and number (e.g., CC 4300) in the label field. The results (right side of screen) show two tissue vials for that specimen (barcodes MVZ238128 and MVZ238129). The first is in position 45 in a freezer box located in Freezer 2, Section F, Rack 55, Slot 3. The second is in position 3 in a freezer box located in Freezer 2, Section F, Rack 55, Slot 5.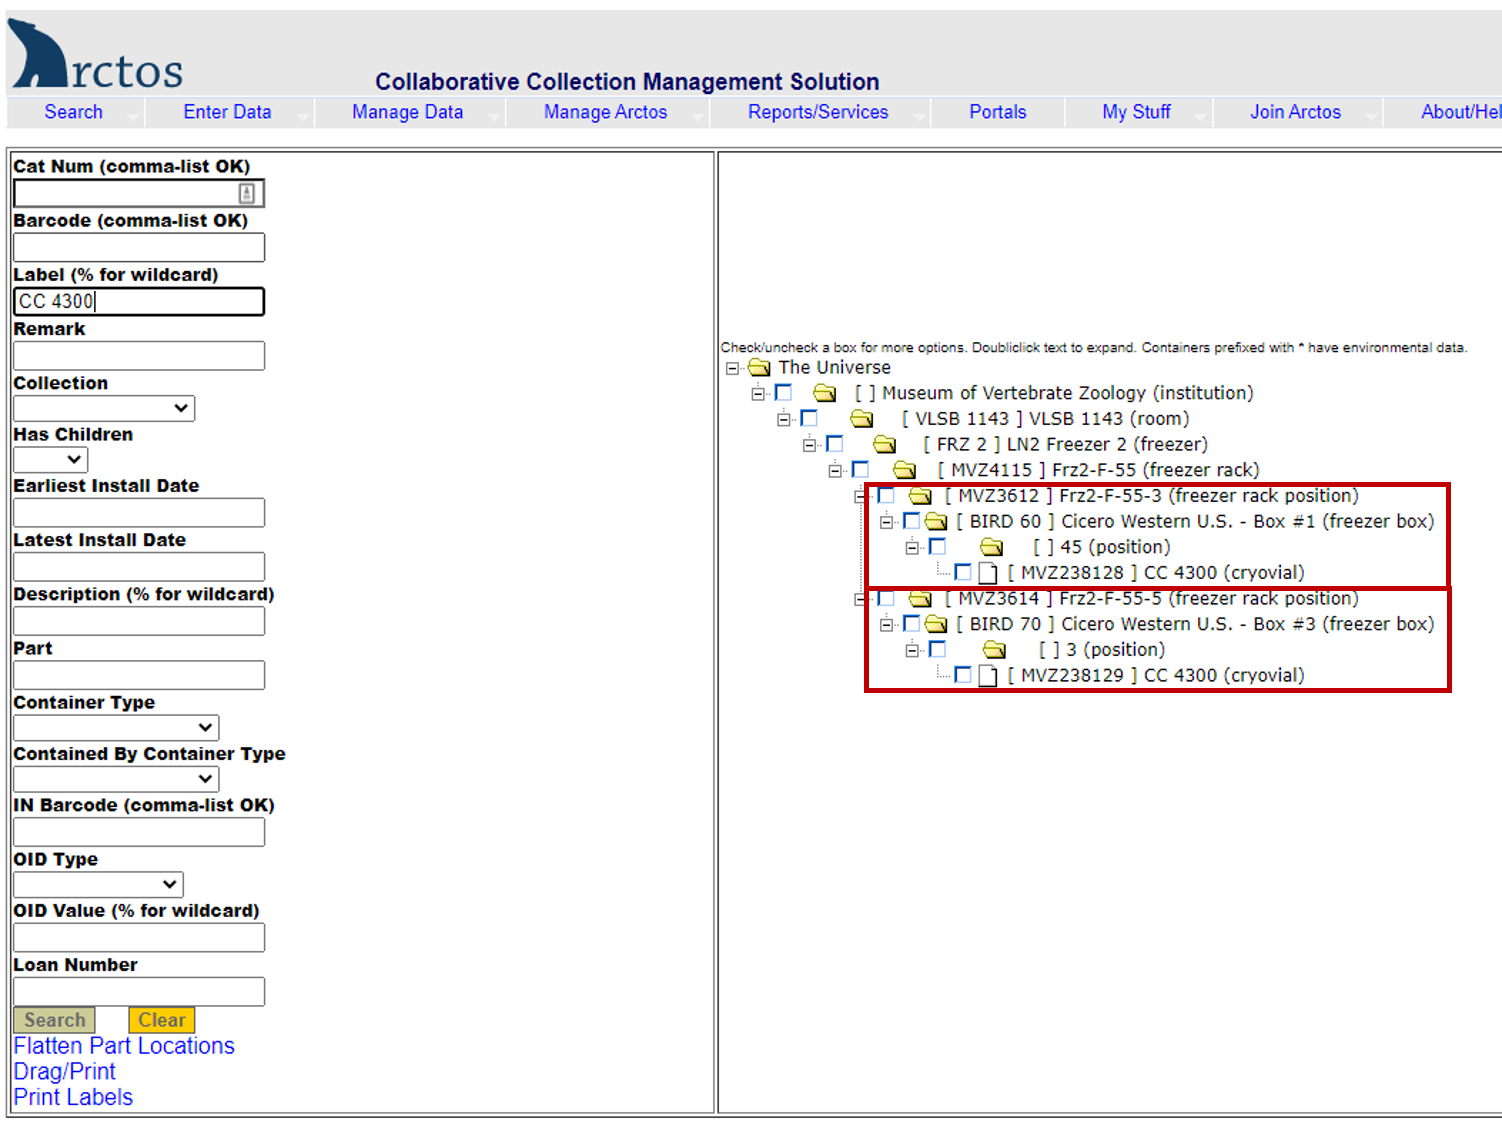
Example of searching for a tissue box by the description:
Enter the description in the label field, using the wildcard symbol “%” as needed (e.g., %mcguire%2010%). The results (right side of screen) show nine boxes in Freezer 1, Section G, Rack 46, Slots 1-8 and 13.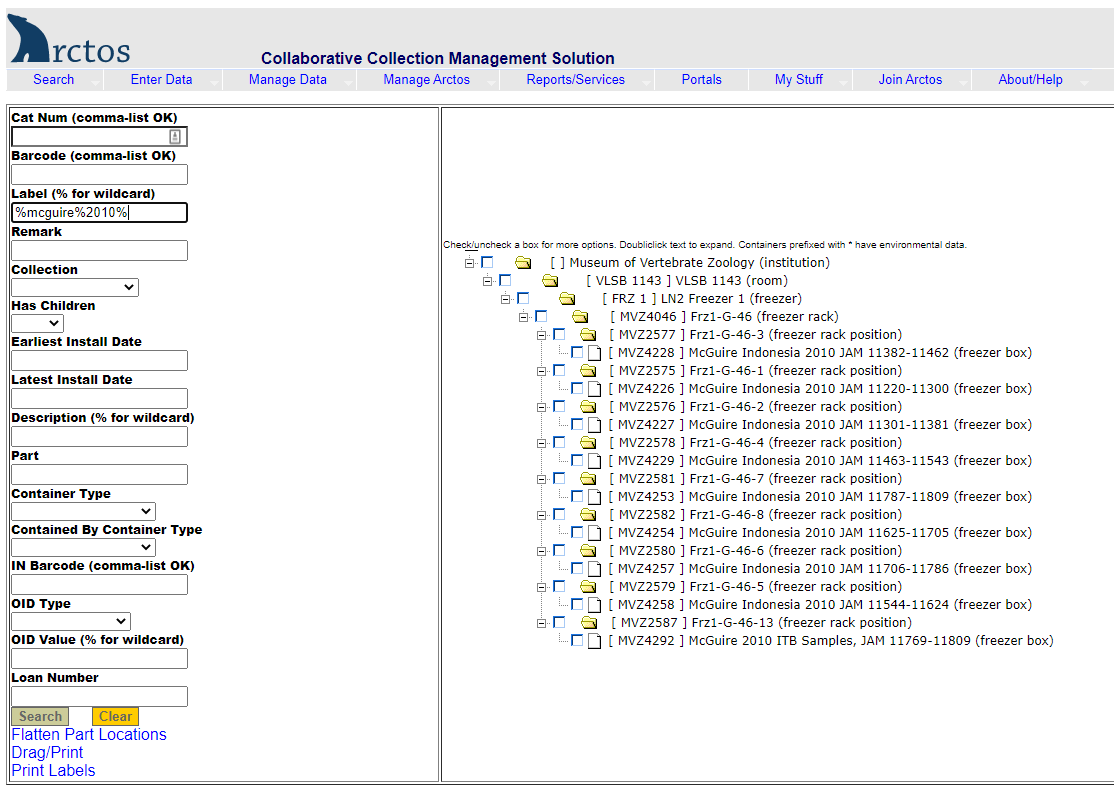

- Enter “tissue” as a part name, press tab, then select the preservation method from the drop-down list.
- The default condition is “unchecked” but enter something else if applicable (e.g., “tissue possibly degraded”).
- The default disposition is “in collection” but enter something else if applicable (e.g., “missing” if tissue was reportedly collected but could not be found when cataloging).
- The default count (#) is 1. Leave that as is. If multiple tissue vials were saved, each vial should be entered as an individual part because it can be tracked separately using the barcode.
- Scan the barcode from the vial using one of the scanners available in the liquid nitrogen room. Always make sure that the barcode scans correctly (i.e., that “MVZ” precedes the number). This step can be done after the initial data entry, if it’s easier to first enter the specimen data in the main curatorial work area and then handle all of the tissues at once.
- Enter the tissue type(s) in the remarks field, or any other remark such as information about the tissue disposition if not in the collection.
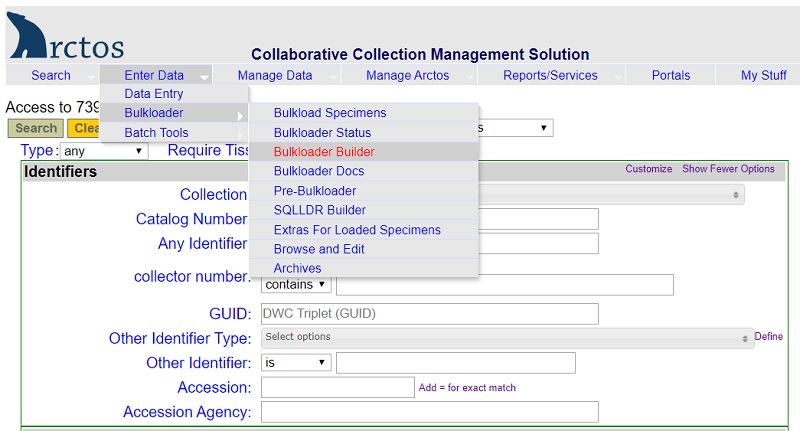
- Bulkloader spreadsheets are useful when cataloging accessions with more than 20-30 specimens. Bulkloader templates can be built and downloaded from Arctos (Enter Data –> Bulkloader –> Bulkloader Builder).
- Arctos requires 4 columns for each part, and column headings must match the Arctos bulkloading format. The following headings are required: PART_NAME_1, PART_CONDITION_1, PART_LOT_COUNT_1, and PART_DISPOSITION_1. Other fields include PART_BARCODE_1 and PART_REMARK_1. Barcodes can be added later and thus don’t need to be in the spreadsheet. Part remarks that indicate the tissue type(s) should be added to the bulkloader spreadsheet if known. Follow the same guidelines as for Data Entry Screen when entering values in these columns.
- If there are multiple tissue parts for a specimen, repeat the set of columns but change the headings to be PART_NAME_2, PART_CONDITION_2, PART_LOT_COUNT_2, PART_DISPOSITION_2, PART_BARCODE_2, PART_REMARK_2, and repeat as necessary for more parts by incrementing the number to reflect the number of parts
PART_CONDITION_1= “unchecked” (default) or “tissue degraded” (or some other condition) if noted by the preparator
PART_LOT_1 = “1” (if there are >1 vials, create a new part for each one)
PART_DISPOSITION_1 = “in collection” (or “missing” if not found, “discarded” if thrown way, etc.)
PART_REMARK_1 = “Heart, liver, muscle, kidney.” (or whatever the tissue type is indicated for that vial)
- If the data have been loaded into Arctos, then tissues must be entered by editing the parts in the specimen detail page.
- Search on the accession in Arctos to get a list of specimens (Search —> Catalog Records —> Accession), or search directly for the specimen you want to edit (Search —> Catalog Records —> Catalog Number). Click on the MVZ number to get into the specimen detail page.
- On the right side of the screen in the Parts box, click ‘edit’ to get to the editing screen.
- If a tissue part already exists in Arctos, but without the barcode, skip to step 10 below.
- If you need to add a new part, go to “Add Specimen Part” and enter ’tissue’ in the Part Name field and hit the tab key. This will provide a pop-up window with different tissue part options from the controlled vocabulary. Select the part that matches the tissue you are cataloging, e.g., ’tissue (frozen)’ or ’tissue (RNAlater).’
- In the count field, enter one (1). If you have more than one tissue vial for a specimen, enter each one as a separate part. This is important because each vial has its own barcoded and can be tracked separately for loans.
- In the disposition field, enter ‘in collection.’ If there is supposed to be a tissue according to the original data, but you cannot find it, enter ‘missing’ to track that one existed at some point.
- In the condition field (required), enter ‘unchecked’ unless the preparator noted something about the tissue, e.g., ’tissue degraded’ in which case enter that. Enter condition in lower case.
- Remarks can be used to make a comment about the tissue, e.g., if disposition is missing, enter something about when it was found to be missing (‘Tissue not found when cataloging specimen May 2020.’). Enter the remark as a sentence, starting with a capital letter and ending with a period.
- Scan the barcode on the tissue vial into the ‘AddToContainerBarcode’ field (or if the tissue part has already been created, into the ‘Add to barcode’ field. Make sure that when you scan the tissue barcode, it scans properly with the number preceded by ‘MVZ’ with no space. This is very important because if scanned improperly, the barcode may be affiliated with a different collection in Arctos.
- Hit “Create” to save the new part.
If there are multiple vials for a specimen scattered across different boxes, it’s best to scan one box at a time rather than scanning all of the vials for a record before moving to the next record. To find the specimen associated with the next vial in the box, search for the collector number in the specimen results (e.g., control-F on a Windows computer), make sure that the collector and number in Arctos match the vial, and click on that specimen to enter the tissue part/barcode.
Labeling Tissue Cap Inserts
Nalgene caps for standard MVZ tissue vials accommodate color-coded inserts that are used to label the collection. The collection is color-coded as follows:
- Birds – white
- Mammals – yellow
- Herps – green
After specimens and tissues have been cataloged for an accession, tissue vial cap inserts should be labeled with the MVZ catalog number and the collector initial plus number using a “Cancer” pen as follows:
- Write the MVZ number (e.g., 191967) just below the semi-circle hole in the insert
- Draw a line below that number
- Write the collector’s initials and number below the line (e.g., DRW 174)
Because the collector’s initials and number are written on the vial, adding this information on the cap insert allows matching of the cap and correct MVZ number with the vial in case of inadvertent mixing.
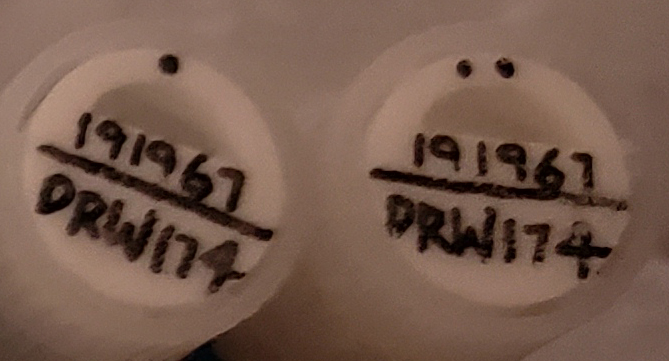
If there are multiple vials for a given specimen, add a single dot above the hole for the first sample, 2 dots for the second sample, 3 dots for the third sample, and so on. If the multiple vials have different preservation methods, the first dot should be given to tissue that was preserved frozen (e.g., in liquid nitrogen, if relevant) and subsequent dot(s) to other samples with a different preservation method (e.g., RNAlater). Do not add any dots if there is only one vial per specimen.
If there are multiple inserts to write, it’s best to do them all at once before inserting then into the vial cap. To keep them in order, use wide packing tape and put a large piece that’s rolled to stick front and back onto a piece of cardboard (e.g., and old broken skin tray or any other cardboard). Stick the inserts onto the tape in the order of the cataloged samples.
When ready to insert them into the vial caps, find the correct vial (make sure it matches the data!) and align the insert with the writing on the vial. The orientation of the writing on the cap insert should be parallel (more or less) to the writing on the side of the vial, so that it is easy to read without having to rotate the vial. Carefully put the insert into the indented part of the cap, making sure that it goes down evenly so that the insert is flush with the vial cap all around. Use forceps (or any other similar tool) to remove ice from the inside of the cap before adding the insert, if necessary.
Installing Tissues
Tissues should be installed into the collection soon after they are labeled with the MVZ number. All tissues are installed in one of the three MVZ liquid nitrogen tanks on the first floor of VLSB (Freezer 1 – Herps; Freezer 2 – Birds; Freezer 3 – Mammals). Most tissues are housed in 9 x 9 (81 position) polycarbonate boxes that are labeled with a barcode that consists of “MVZ” and a four digit number (e.g., MVZ5979). Boxes without grids also may be used for large vials or odd tissue containers (e.g., carnivore tissue in tin foil).
Follow these steps when installing tissues into the collection (see figures):
- In Arctos, go to Manage Data –> Object Tracking –> Find Container.
- On the left side of the screen in the Barcode field, scan the barcode of the box where tissues are being installed.
- On the center of the screen, click on the little square box to the left of the barcode number of the box.
- On the right side of the screen, click on “Positions”.
- Place your cursor in the cell for the position where you want to install the tissue, and scan the vial barcode into that position. If the vial has been scanned previously in a different box, scanning into the new box will automatically move the tissue vial in Arctos and create an empty cell where it was previously. Hit tab to move to the next cell.
- Continue doing this in subsequent cells (positions) for each tissue to be installed.
- When done with the box, find the rack in the liquid nitrogen freezer where you want to put the box. If this is an existing box that was previously installed (and to which you’re adding more tissues), put the box back and you’re done.
- If this is a new box that has never been installed before, you must scan the box into the right position in the rack in order to record its location. This is done in the following steps.
- In Arctos, go to Manage Data –> Object Tracking –> Move Container.
- At the bottom in the field for “Parent Barcode,” enter the barcode on the side of the slot or shelf where the tissue box will be installed.
- At the bottom in the field for “Child Barcode,” enter the barcode of the box with the tissues to be installed.
- Hit “Move Container” and you’re done. Put the rack back in the freezer.

