- General Overview
- Preparing to Catalog
- Cataloging Small Accessions
- Arctos Data Entry Example
- Arctos Webinar on Data Entry and Bulkloading
General Overview
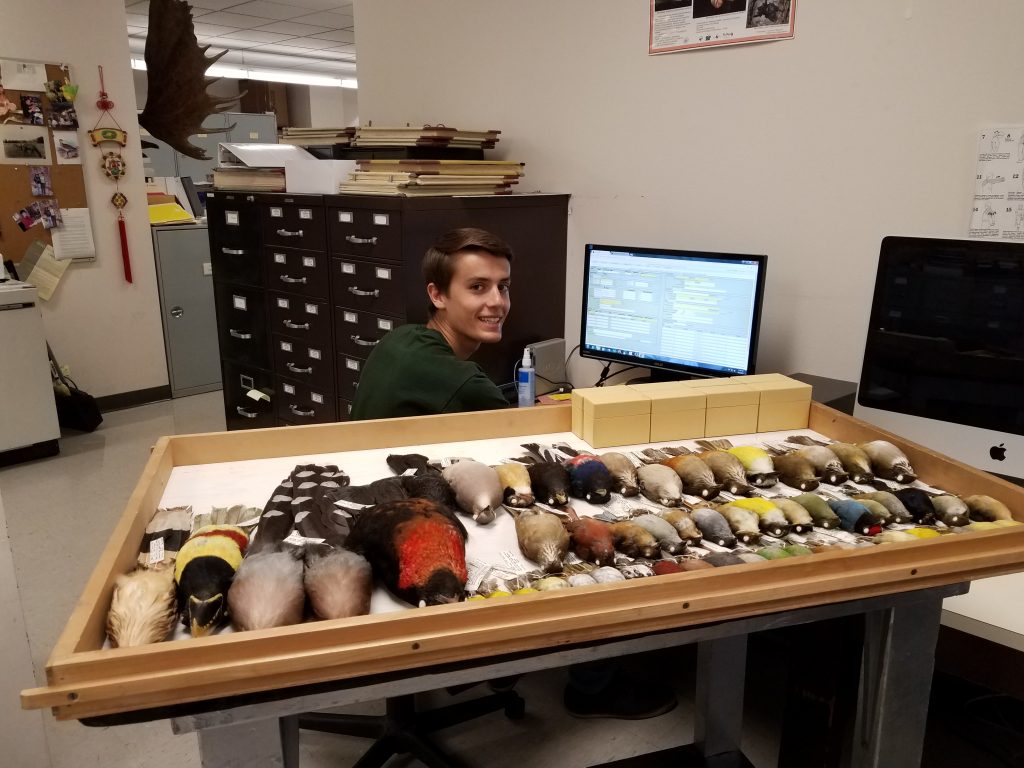
Cataloging a specimen involves two main steps: (1) assigning each specimen a unique MVZ catalog number, and (2) recording specific information about the specimen in Arctos. Once the catalog records are complete, a hard copy ledger is printed and stored in a three-ring binder.
Bird specimens (skins, skeletons, fluid-preserved whole organisms) are cataloged separately from eggs and nests. These two collections are identified in Arctos as “MVZ:Bird” and “MVZ:Egg” respectively. All parts derived from one specimen (e.g., skins, skeletons, fluid parts, tissues) will bear the same number in the MVZ:Bird catalog. Likewise, a nest with eggs will have the same number in the MVZ:Egg catalog.
MVZ also catalogs observational records. These are often (but not always) associated with media such as audio recordings or photographs. The procedure for cataloging observations is the same as for specimens, except that the collection is entered as “MVZObs:Bird” and the catalog number series is separate from that of specimens. In addition, observations do not have parts entered. See the Staff Curator about assigning numbers to observational records.
Specimens are not cataloged until all specimens from a given accession have been prepared, frozen for pest management, and moved to a curatorial case. Skeletons may be cataloged before or after they are cleaned by the dermestid beetles; however, uncleaned skeletons in a curatorial cabinet should be cataloged before they are sent downstairs for cleaning. Eggs should be blown to remove contents before cataloging.
Do not begin to catalog an accession until you have the Curator’s permission to do so. All specimens from one accession should be cataloged together. Refer to the accession card and to the collector’s field notes to ascertain the number of specimens that should be present.
If the accession includes fewer than 10-20 specimens, data can be entered directly into Arctos using the single data entry screen. For larger accessions, data should be entered via a bulkloader spreadsheet. “Data entry” permission in Arctos must be assigned by a Curator in order to create new specimen records.
Preparing to Catalog
-
- Obtain the field notes or other original data that contain the specific information about each specimen.
-
Inventory all specimens to make sure that everything in the accession is accounted for. For accessions of more than a few specimens, this is best done using Excel or Google docs.The inventory should indicate the primary type of specimen, e.g., skin (study, flat, etc.), wing, skeleton, whole organism in ethanol, etc. Additional parts such as stomach contents, syringes, parasites, and tissues are noted later in the cataloging process (see below).
-
Refer to the original field notes or data for species identifications, and confirm that the identifications are correct. If a specimen is not identified to species, or if there is a question about the identification, consult with a Curator.
For polytypic species where at least two subspecies have been described, determine the subspecies if possible based either on geographic distribution (especially if the specimen was collected from a breeding population) or by comparing the specimen (if a skin) to others in the collection. Use the following references to aid in subspecies determination: (1) Birds of the World; (2) Clements Checklist; (3) Grinnell and Miller’s (1944) Birds of California, which includes maps of selected species; and (4) other taxon-specific reference books.
It is also good practice to search Arctos for other MVZ specimens from the same general geographic area (e.g., county), and compare their subspecies identification(s) with those in the reference books. In addition to helping narrow down the subspecific identification, this will point out subspecies discrepancies in different sources. If a discrepancy is found, if there is disagreement among different sources on subspecies, or if identification is questionable, consult a MVZ Curator of Ornithology. - Arrange the specimens by how they are organized in the collection – see “Organization of the Collections” and “Installing Bird Skins” for details. If the accession includes a mix of skins and other types of parts (skeletons, fluid-preserved whole organisms), follow the arrangement for skins.
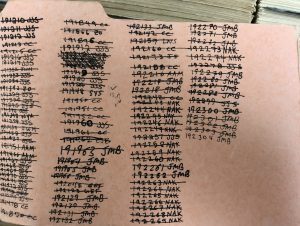 Get the next available catalog number from the orange card at the back of the bird catalog cards in the curatorial area. When removing the card, make sure to replace it with the “Catalog Closed” card so that two people don’t assign the same number to different specimens. Once you have finished taking the number(s) you need, cross off the last number on the card, write the next available number, and add your initials to track who is assigning numbers.
Cataloging Small Accessions – Arctos Data Entry Interface
-
-
-
-
-
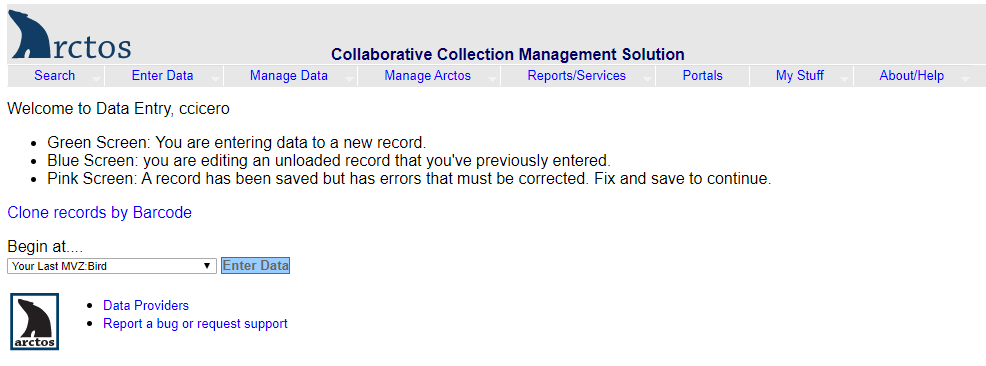
Log in to Arctos and go to Enter Data → Data Entry. Select “Enter a New MVZ:Bird Record” (or “Your Last MVZ:Bird” if you are continuing) and hit “Enter Data.” You will be taken to a green screen with all of the fields for entering a new MVZ bird record.View this short video tutorial on how to customize the data entry screen.If you are entering an egg/nest record or an observation, select the appropriate collection to begin data entry.
-
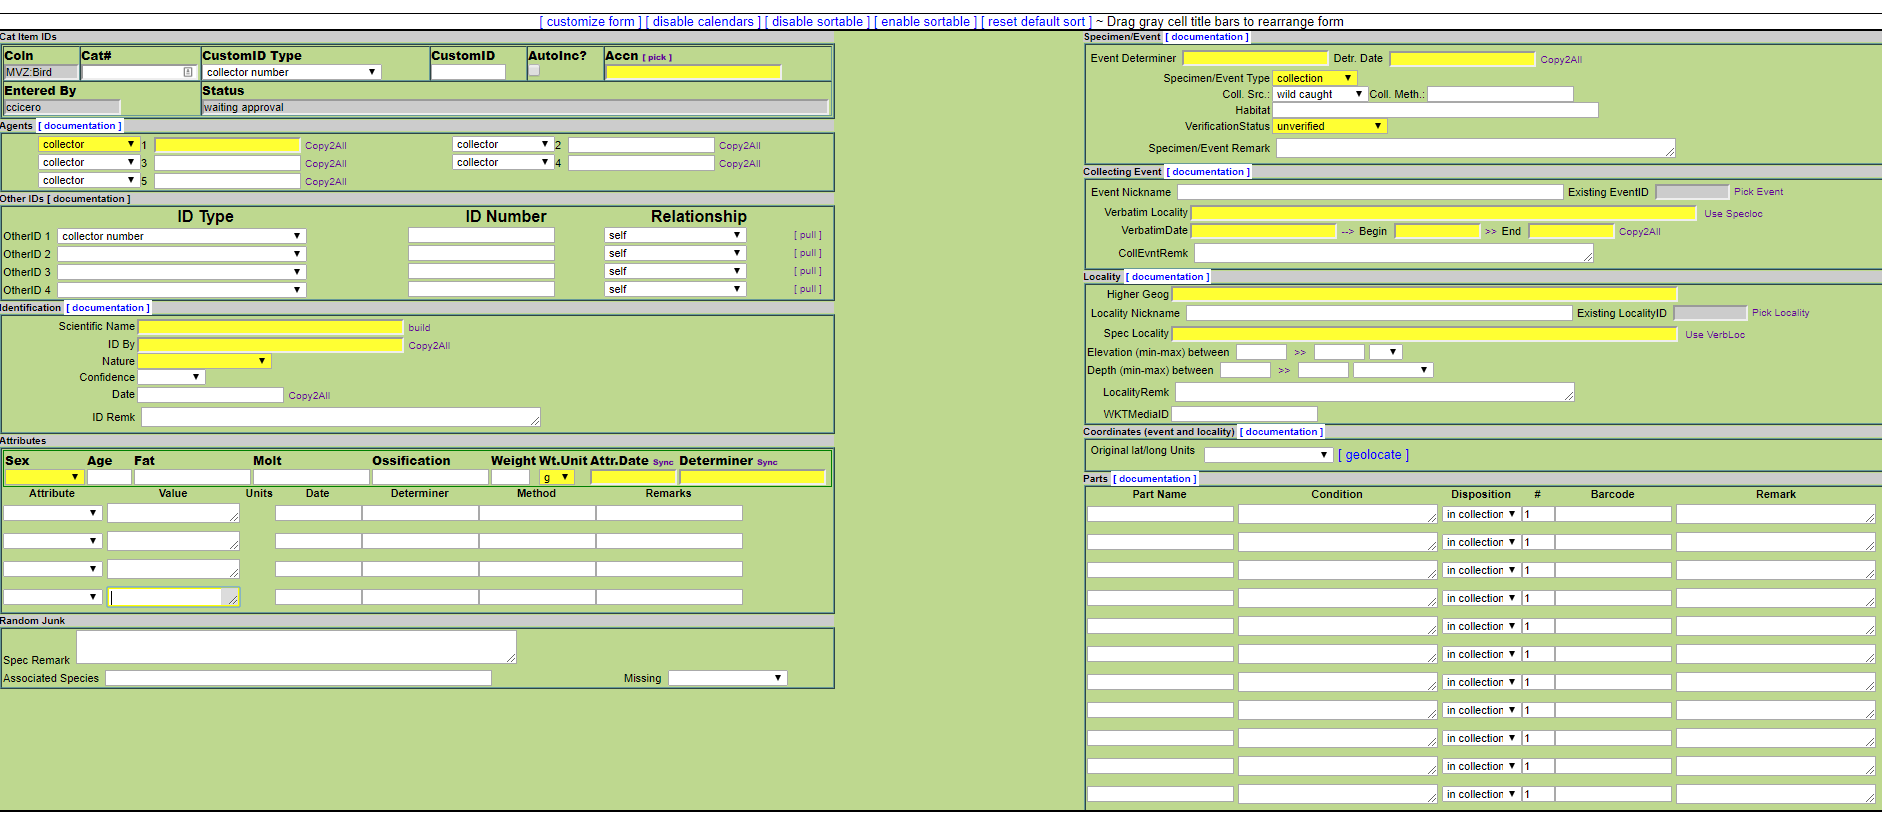
Catalog number: Enter the next available MVZ bird catalog number in the Cat# field.
-
Accession: Enter the accession number in the Accn field and hit the tab key to select the accession. Alternatively, click on the “pick” link and search for it there, then select to enter.
-
Agents: You can enter multiple agents (people, organizations). Agents must be picked from the agents table. Agents must first be added to Arctos (by MVZ Staff Curator) before they can be selected. For each agent, enter the last name and hit the tab key to get to the agents table in Arctos, then select the correct name.Each record must have at least one collector. Enter the collector’s name in the first field, then subsequent agents in additional fields if relevant. If there is a collector and a preparator, select “preparator” instead of “collector” from the drop-down menu for agent #2. Repeat for as many agents as necessary, making sure to properly designate the agent as a collector or preparator. If the collector is unknown, enter “unknown” as the agent and hit the tab to select that.
-
ID Type, ID Number, Relationship: These fields refer to the unique, original number associated with the record.You must select the ID Type from a drop-down list (e.g., collector number, preparator number, MVZ Prep Lab Catalog, LWH: Lindsay Wildlife Hospital).Enter the ID Number as follows: for collector/preparator numbers other than the MVZ Prep Lab Catalog (PLC), enter the number without initials. The only time to use initials is if there are two collectors and one collector number, or two preparators and one preparator number; in that case, enter the initials plus number to make it clear which person the number refers to. For specimens with MVZ Prep Lab Catalog numbers, enter the number preceded by PLC (e.g., PLC 1234). For other number such as Lindsay Wildlife Hospital, enter the original number preceded by initials such as “LWH 2020-1234” (note that the year is spelled out, although the original number on the LWH sheet may have the year abbreviated).Relationship: Relationship will typically be ‘self’ (the default value) when you are entering data for a single specimen. If there are other types of relationships indicated by the notes (e.g., “mate of” “parent of” “collected with” etc.), those can be entered later.
-
-
-
Identification: Enter the scientific name, ideally down to subspecies if that has been determined. Hit the tab key to select the identification from the Arctos taxonomy table. If the identification is questionable or involves multiple taxa (e.g., hybrid), use the “build” link to build the identification from formula options.For ID By, enter the last name of the identifier and hit the tab key to select from the agents table. The identifier refers to the lowest identification made, (e.g., species or subspecies); it may be the person who collected or prepared the specimen (if identified just to species), or the person who identified it to subspecies. It may also refer to an expert who examined the specimens and confirmed its identification in the museum.Enter the Nature of the identification from the drop-down list (see definitions for the list of options). Typically, this will be either ‘features’ for records identified to species based on phenotype, or ‘geographic distribution’ for records identified to subspecies.Select a Confidence value for the identification. This is optional, so if the identification was made to species by someone other than the data enterer, it can be left blank unless you are certain that the person is proficient in bird species identifications and/or the species would be hard to misidentify (e.g., an American Robin).Enter the Date of the identification. This is not required by Arctos but is important data, so do not leave it blank. If the specimen (or observation) was identified to species in the field and there is no subspecies identification, then the date should be the collection date. If the specimen was identified to subspecies by the data enterer, or if it was identified in the museum by an expert other than the data enterer, then it should be the date of that identification.Provide any additional information about the identification in ID Remk. This might include comments about the basis for the identification, such as comparison with other specimens in the collection. It might also include comments about unusual plumage that influenced the identification. Enter the remark as a sentence, starting with a capital letter and ending with a period.
-
-
-
Attributes: Attributes refer to biological characteristics such as sex, age, molt, fat, reproductive status, mass, measurements, colors, etc. They also include things like whether the specimen was examined for parasites and if parasites were found, as well as the verbatim preservation date if different from the collection date (e.g., a specimen that was received as a whole carcass and later preserved in the MVZ Prep Lab).Attributes are collection-specific, so that MVZ:Bird and MVZObs:Bird will have the same set of attributes, while MVZ:Egg have a different set of attributes (e.g., clutch size, incubation stage, nest description, etc.). See the complete set of attribute types in Arctos.Enter attributes from the original data source (e.g., fieldnotes, Prep Lab Catalog). Enter as many attributes as you can. The single data entry screen has a limited number of options, so some attributes may need to be added after the record is loaded into Arctos.Each attribute requires an attribute type, attribute value, attribute determiner, attribute method, and attribute determination date. Attribute remarks is an optional field. Attribute method is optional but is used when sexing birds by plumage, for example, if gonads could not be found. Click on the little ‘sync’ links next to Attr. Date and Determiner to replicate the date and name across all attributes being entered.Some attributes are controlled by pick lists (e.g., sex), while others are entered as free text. Specific guidelines for entering attribute values for birds:
- Enter all attribute values for birds as lower case, except for remarks which should entered as a sentence (being with a capital, end with a period)
- Spell out all attribute values, e.g., “skull” instead of “sk.” or “left testis” instead of “LT”
- Select sex from one of the values in the drop-down list; if sex is recorded as unknown in the original data (e.g., circle with a question mark), select ‘recorded as unknown’ for the sex; this is different from ‘not recorded’ where the original catalog doesn’t say anything about sex, or ‘unknown’ where you don’t have any original data and can’t sex the bird
- Enter age data as text in the ‘age’ field; do not use the ‘age class’ drop-down
- For standard bird fields (age, molt, fat, reproductive data), enter ‘not recorded’ if no data are given
- Weight is a numeric field with a separate field for units; if no weight is recorded, leave it blank (do not enter ‘not recorded’)
- Enter ‘verbatim preservation date’ in the format ‘d mmm yyyy’
- Use commas (not semi-colons) and spaces to separate different values for an attribute, e.g., ‘ovary 5 x 3 mm, ova minute’
- Enter molt data as entered by the preparator
- If parasites (or lack thereof) were noted in the original data, enter ‘yes’ for ‘endoparasite examination’ and either ‘yes’ or ‘no’ for ‘endoparasites detected’ (typically the notes refer to endoparasites, although sometimes ectoparasite are also noted); if parasites are detected and described, enter the description in remarks for that attribute, e.g., ‘endoparasites detected’ = ‘yes’ and remarks = ‘Tapeworms in body cavity.’
- For eggs, enter clutch size as a number; this should reflect the number of eggs in the entire clutch, and if fewer eggs were saved, this would be entered in the lot number field for the part (see below).
-
Spec. Remark: Specimen remark should be used to record things such as the circumstances of death (e.g., ‘Killed by cat.’ ‘Dead on road.’ ‘Hit window.’ ‘Dead under windmill.’) as well as other information not captured by specific fields (e.g., ‘Banded on right leg with USFWS number 123456.’). Do not use remarks to enter the condition of the specimen; that should be entered for the specific part (see below). Enter the remark as a sentence, starting with a capital letter and ending with a period.
-
-
-
Specimen/Event: Specimen/Event links specimens to collecting events, and records information about the type of event, collecting source, collecting method, and verification status.Event Determiner is the person who said that a particular specimen was collected at a certain place and date.The Detr. Date is the date when the event was determined. Both of these fields are required. Typically for new records, this would be the collector and the collection date, respectively.Specimen Event Type is a required field that uses a controlled list. ‘Collection’ is the default value. ‘Observation’ should be selected for non-specimen records (e.g., MVZObs:Bird).Coll. Src. is a required field that uses a controlled list. ‘Wild caught’ is the default value and refers to any bird removed from the wild (or observed in the wild). ‘Captive’ should be used for birds that were in captivity (e.g., zoos, aviaries). Birds that were received from wildlife rehabilitation centers should still be entered as ‘wild caught’ even if they were in captivity for a brief period of time.Coll. Method is an optional text field for entering how the specimen was obtained. Enter the value in lower case. The most common methods for birds are ‘mistnet’ ‘salvage’ ‘shotgun’.Habitat is an optional text field for recording basic information about the habitat where the bird was collected or observed. This should be recorded based on what’s entered from original field notes. Enter habitat in lower case (e.g., ‘oak woodland’ or ‘ponderosa pine with brushy understory”).Verification Status is a required field that uses a controlled list. This field is intended to indicate assertions regarding accuracy of the place and time. The default is ‘unverified’ and should not be changed unless done so by a curator.Specimen/Event Remark is an optional text field for entering remarks about the data entered in Specimen/Event, e.g., “Forest was burned in 2000.” Remarks about the event itself should be entered into collecting event remarks (see below), and remarks about the specimen (e.g., “Dead on Road”) should be entered in the “Spec. Remark” field (see above). Enter the remark as a sentence, starting with a capital letter and ending with a period.
-
Collecting Event: Collecting Event refers to the place and time of collection or observation. The MVZ has guidelines for how to enter event information – please read these carefully before starting data entry!In addition to entering new events, you can also pick an existing event if you know or suspect that a specimen is from an event that exists in Arctos. It is also useful to pre-enter collecting events into Arctos if you have a series of specimens from the same event. Click “Pick Event” (upper right of this data entry block) and search on the event – either by a locality or collecting event ID (if known), then accept that event and it will save to the screen. Remember that event is the place/time combination, so if you search by locality, you will need to look at the collecting events for the appropriate locality to get the right date for your specimen/observation.Event Nickname is an optional text field but can be useful as a label for events. Importantly, entering a nickname will ensure that the event is not automatically deleted from Arctos in cases where specimens are moved from one event to another and the event has no associated records.Verbatim Locality is the complete locality as written on the original data. It may include mis-spellings, abbreviations, or obsolete place names (e.g., for legacy data). It also often includes higher geography, elevation, and coordinates for modern data. If the verbatim locality is the same as the specific locality (see below), click on “Use SpecLoc” to fill out the field.Example: Valley View Drive, 3900 ft, Stanislaus National Forest, Calaveras Co., Calif. (GPS: 38.20331°N, 120.39342°W, error 20 ft, datum WGS84)VerbatimDate is a required text field for the date that the bird was collected or observed. It is typically written in the format “d mmm yyyy” (e.g., 5 May 2018 or 19 May 2020) but allows for date ranges, vague dates, or ambiguous dates (e.g., Jan 2020; sometime during 1908; summer 2019; 15-16 Dec 1920; 1950?; etc.).Begin and End Dates are required ISO date-formatted fields that bracket the verbatim date. If the verbatim date is a single date, hit the “–>” arrow to the right of VerbatimDate and Arctos will automatically fill in the two dates. If the verbatim date is a range of dates or otherwise vague/ambiguous, follow the MVZ guidelines for how to bracket the date properly. For example, if only the year is known, then the Begin and End Dates are 1 Jan yyyy and 31 Dec yyyy respectively.CollEvntRemk is an optional text field for entering information about the event. For example, “Verbatim date is uncertain but assumed to be [date] based on the collector’s activities and when the specimen was accessioned in the MVZ.”
-
Arctos Data Entry Example (video tutorial)
Arctos Webinar on Data Entry and Bulkloading
Continue to Installing ➡
-
-
-